Showing posts with label Nicole by OPI. Show all posts

Sunday, October 18, 2015

Musical Month: Ingrid

The musical month continues with the new song Niina chose for us.
Today's inspiration is Johanna Kurkela's beautiful song called 'Ingrid'
The lyrics (of the chorus – no way I'm translating the whole song!!) in English would be something around these lines:
""Today I'm cheerful, look at me -
doing my work with a smile on my lips.
And you're so blind to see
how I'm exhausted down till fingertips.""
I wanted to illustrate the dark and the light side we all have in us – and I definitely wanted to add a dash of hope in the form of wheat stalks. I believe we all have the seed for good in us, which we can foster and let grow to something beautiful – and also nourishing for others – with the right people  and love around us. The album cover was also clearly shot on a field, so maybe that's where the crop idea came from...
The base colours were picked from my oldies – as I have already packed my fave new polishes and shipped them to Spain where we are going to move shortly. The dark polish is Essence Urban Messages Nightline (it's definitely more blue IRL than in these pics), and the light peach is Nicole by OPI Persuasive Peach. They both needed four coats Now I remember, why I didn't pack them...
I picked the colours, and the idea for sponging, from the cover art of the album, which I really appreciate in so many ways. That's exactly the kind of landscape I watch from my desk at home, ever changing with the turn of the seasons, and I love it!
For the dark stamping, I mixed Konad's shimmery blue and Mundo de Unhas black stamping polishes. The bronze stamping polish is Kiko mirror 629.
The wheat stalk image came from Born pretty plate BP-L007, and the swirly image from BM-314. The latter is one of my most trusted stamping templates. It seems to save every manicure heading for disaster..  I actually have to stop myself to putting it on every other mani I make. Do you have those images, which just simply call your name every day?
But enough about me! The other girls have made awesome nails, too! Go and see at least Janina's art at her blog "Never grow up"!

Wednesday, December 25, 2013

Merry Christmas Manicure

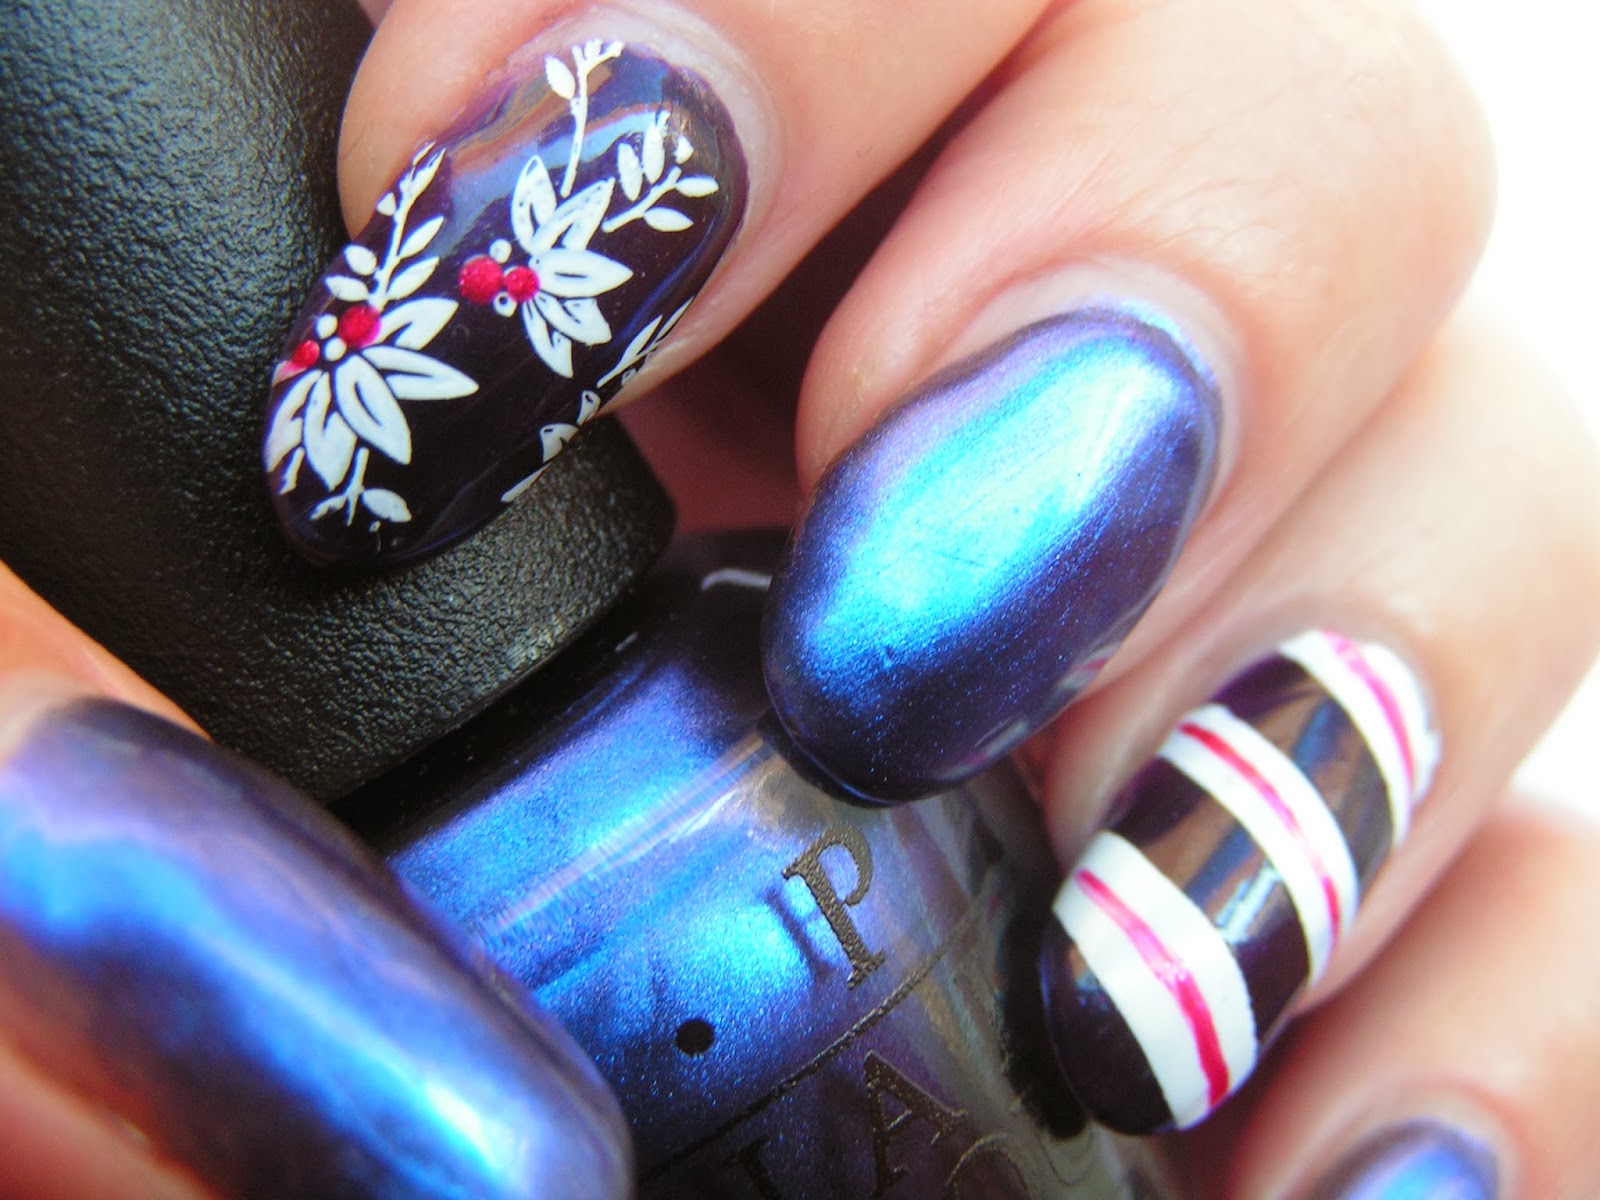
This purple and blue manicure was supposed to be only a dress rehearsal, but it turned to my official Christmas manicure. The time I could have decorated my nails I spent decorating cookies. Well, it was fun and a bit artsy anyways - just the things I love in my nail hobby.
 The base colours here are OPI Into the Night and Revlon Parfumerie wild violets.
I have to say I was disappointed with the OPI opacity - it needed four coats. I loved the result, though, and it didn't stain.

I used Mavala white and Nicole by OPI Celebration in Red for the candy cane accent nail.
The inspiration for the mistletoe nail came from the awesome Canadian Nail Fanatic – one of the first blogs I started to follow and which I'll never let go. I used Pueen 15 image plate and Konad stamping polish in white, and then added tiny dots with CiR.
 This manicure is also the first one for a project I decided to start from the beginning of 2014. Want to hear more? Stay tuned!
Happy Holidays to You, my dearest readers!

Sunday, April 21, 2013

O - Orna-ment For Each Other

The ABC Challenge advances slowly but steadily... For my own surprise I've not forgotten it when joining other challenges like the Tri Polish challenge I'm loving right now..
My O polish screams Christmas: Nicole by OPI Orna-ment For Each Other
To ease the removal, I used it over two coats of OPI Off With Her Red. In a complete lack of inspiration attack I created a simple accent nail with a cheapo Yes Love D1 glitter polish.
I actually liked the mani most when I had only OWHR on my nails. I recently cut my nails quite a bit shorter and my personal opinion is that bold, darkish colours look their best on shorter nails. I'll definitely be wearing more vampy reds, deep blues, gorgeous dark greens while my nubbins last...


Thursday, December 6, 2012

C - Colorblind

This third post in the ABC-series is dedicated to Dandy Nails, and Sandy's great creation Colorblind.
I began with two coats of Nicole by OPI Celebration in Red - a great festive colour.
Speaking of coats with these kinds of glitters is a bit evasive, so let's say I added a generous dabbing of Dandy Nails Colorblind.
 I loved the result so much, that I wanted it to last for days...
 ...so of course I had to try it sandwiched with one thin coat of Flormar U14.
And then I had to try matifying it...
And then I had to try a black/clear water marble on the ring finger...

And then, having at least 7 coats of polish on my nails, I had to reach for the remover. End of story.

PS: I've added a new board to my Pinterest. I hope you'll enjoy my pins!!

Thursday, May 10, 2012

Interlocking Glitter Skittle

Again a manicure for getting to play with my swatchsicles and getting some polishes out from my untrieds.
The base is two/three coats of Catrice I Wear My Sunglasses at Night. I was a little disappointed with the glitter effect on the nail - or the lack of it. It is much more visible in these pics than IRL, even if you place your nails right under your nose.


I went on to paint interlocking diagonals with (from pinky to thumb, left hand):
Orly Vip
Essence Circus Circus Cotton Candy glitter
Nicole by OPI My Sleigh's in the Shop
Milani Purple Gleam and
China Glaze Skyscraper.
And this is the right thumb:
Milani Silver Dazzle
As always, the greatest fun was organizing my swatchsicles, choosing the colours and just fooling around.
There you can see the ones I chose and also the ones that didn't make it.
The two Milanis were the worst topcoat eaters, propably because they are so dense that the glitter pieces sit on the top of each other. Well, there's nothing that three coats (!) of Seche Vite couldn't handle..
 Generally I loved the most the Nicole by OPI and Milani Silver Dazzle. I'd say it's because they have the clearest contrast with the base. Which brings to me an idea of interlocking mani with contrasting colours.. hmm...
Funny how these glitter polishes remind me of those glitter glues we used to buy before christmas to decorate christmas cards, and which were totally equally useless every time..
I had marvelled at these interlocking manis before in some blogs, and making my own was really quite easy. I used scotch tape to line out a diagonal section for the glitter, and then a dotting tool to make the "interlocking" lines of dots.

By the way... I love saying glitter skittle.. :) Try it!

Friday, February 17, 2012

Nobody Else Butt You!

I wanna be loved by you, just you, nobody else butt you... Boop-boob-a-doop!
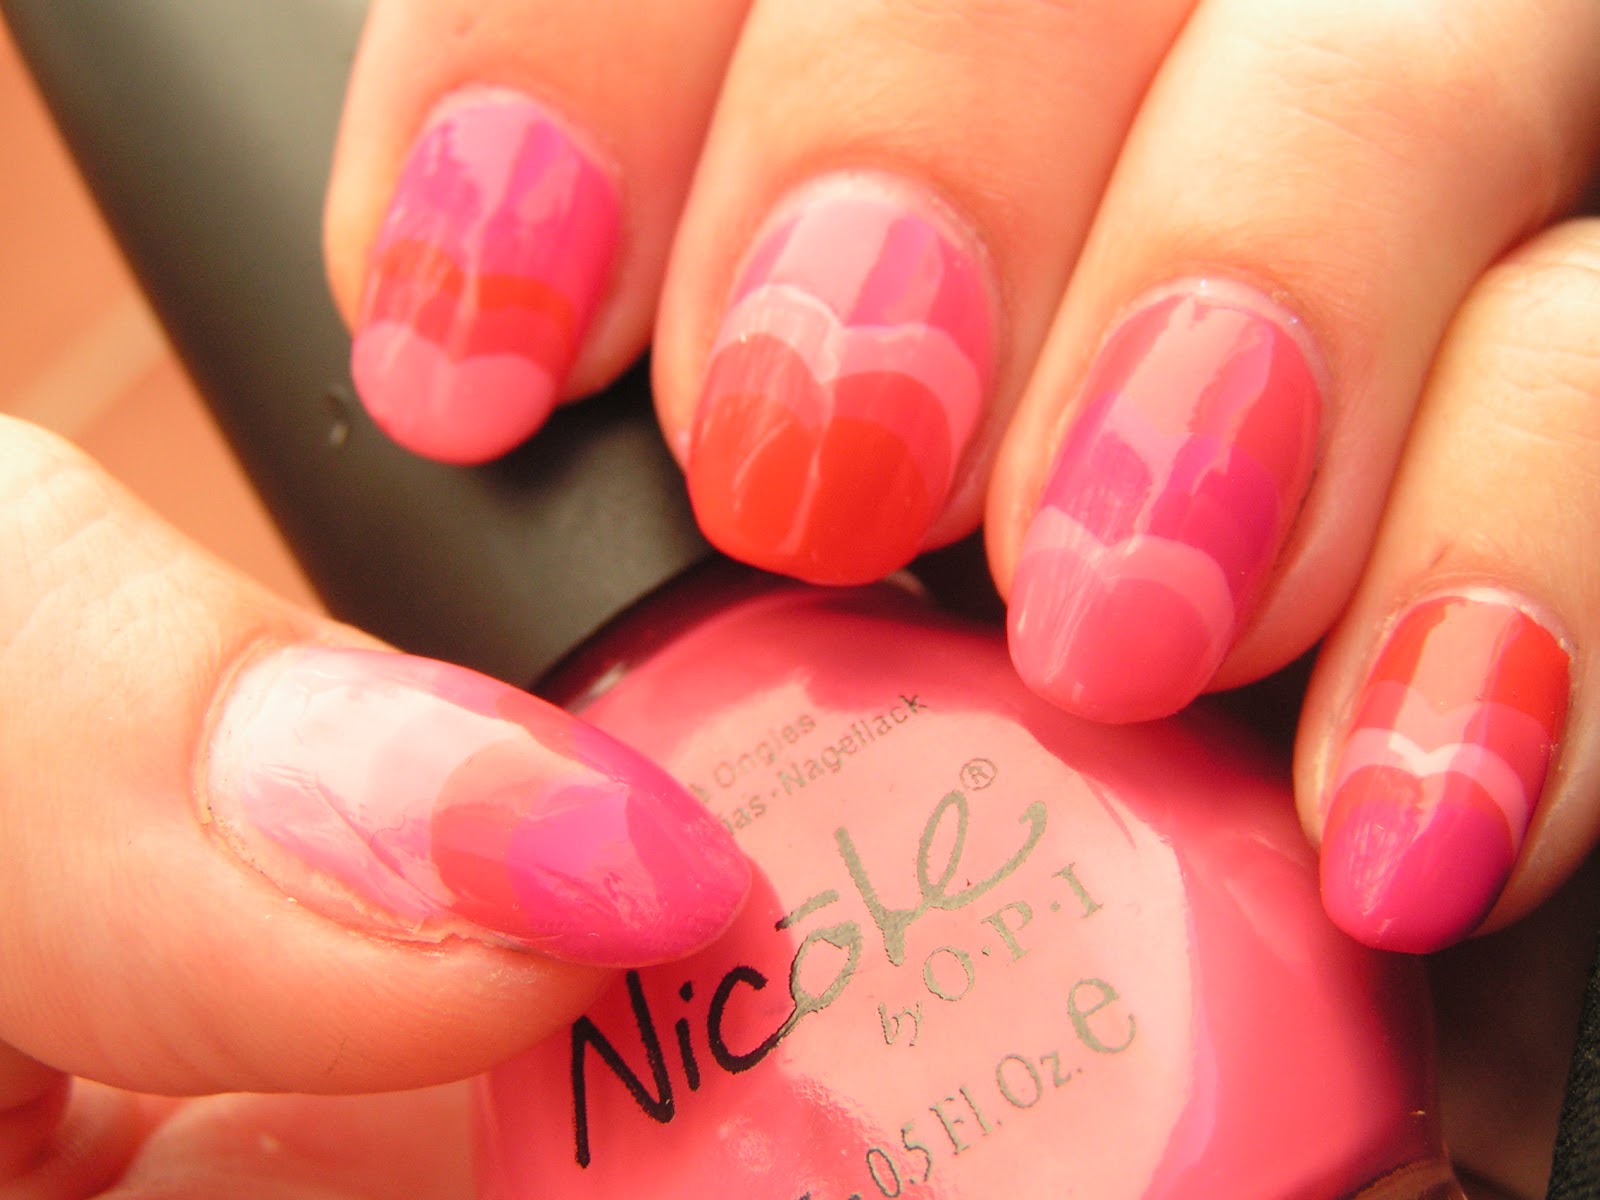
This valentine's mani was inspired by this heart fishtails mani in Chalkboard Nails. Sarah, the lovely blogger there, also calls the top of the heart the "heart's butt" - because that's what it looks like to her (and to me, now that she said it!). So that's why the title..
I wanted to copy her mani, but have the colours to be closer to each other. So I resorted to my new, handy and beloved swatchsicles. You can guess, how many polishes I have swatchsicled altogether! Just throw in a guess, you don't even have to be a polisher to participate! Follow the link at the end of this post.
By the way, I can't say "butt" without seeing this hilarious xerox scene from the movie Despicable Me in front of my eyes. I watched it once on a transatlantic flight. I must admit I know so much better ways to spend time on them...
First I tried to paint all nails in a similar colour combo starting with a base of Sally Hansen I Pink I Can, but I was too lazy to move from the sofa to my desk, painted my nails in bad lighting, and ended up with a patchy base. So I started again and decided to make it a kind of skittle, alternating the order of the colours.
The polishes used were Sally Hansen I Pink I Can, Revlon Bubble Gum, Essie Movers & Shakers, Nicole by OPI Pink Different and Orly Terracotta. As a base all were one coaters, except IPIC and M&S.
 You still have a few days to throw in a guess at my guessing game/mini giveaway! Go ahead!


Thursday, February 9, 2012

Purple Glitter on Purple Glitter

Today's mani is just another random splash of polishes from my untrieds. I begun with two coats of Essence Vampire's Love True Love. It is almost a one-coater, and a lot less black on the nail than in the bottle.
Once again - also to use as many of my untrieds as possible - I did some simple sponging with two purple glitter polishes Milani Purple Gleam and Nicole by OPI My Sleigh's in the Shop.
Here you can really see the coarse surface after sponging. You could grate parmesan cheese with these! (Although you'd get some purple glitter on your pasta, then)
 Here we are with two coats of SV. That's better!
 The purple glitter polishes are quite alike in the bottle, and I feared I'd bought dupes, but applied on the nail (or paper) reveals the pink hues and silver glitter in MSitS (on the left). They definitely are different enough to own them both.
To add some simple and quick decorations, I added a diagonal freehand french with Nicole by OPI Silver Texture crackle. The accent finger got one coat of Milani Jewel FX Silver.
That was it! I don't usually wear much silver, but this mani survived for quite a long time. Which was two days.. :)
Remember to leave your mark in my guessing game / mini giveaway here!


Tuesday, December 27, 2011

Christmas Baubles

This is the absolutely last and final Christmas mani this year. Promise! Actually I should be posting the day 31 of the challenge, but I decided to take this mani first before it's waaay too late.
This mani was made for a nail art contest in a Finnish nail blog called Pastel Dreams (my sorry translation, the original is "Pastelliunelmia"). It was the fist time I take part into one and guess what! I won! Woo-hoo! There are some nail goodies in the mail just for me. Meanwhile, you all can go and check out the most pink, fun and girly nail art blog there is!
My idea for the Christmas-themed contest was a Christmas tree and a close-up of the Christmas baubles. I started out with festive base colours and layered different shimmers on them. Then I outlined the shape of the baubles with different shades of green and added roundess with a swipe of glitter. 
For the accent finger I drag marbled the Christmas tree with some rhinestones as the mini baubles. The idea for the Christmas tree was from this drag marble tuto by Colette from My Simple Little Pleasures. I'd seen Colette doing it in the vid with reverse colours, and remember thinking: "Wow, that would look just like a Christmas tree if the colours were the other way round".
And here's a list of all the polishes I used:
Blue: Sally Hansen complete salon manicure Fairy Teal, Orly It's up to Blue and Revlon Blue Mosaic
Red: Alessandro Virgin Temptation, OPI Love is a Racket, Nicole by OPI Orna-ment for Each Other, China Glaze Love Marilyn
Silver: China Glaze Devotion, Gosh Silver, Essence Nail Art Twins Julia
Gold: OPI Bling Dynasty, OPI Pros and Bronze
Greens: Color Club Artsy Crafty, a bit of China Glaze Westside Warrior and Color Club Nouveau Vintage
The next post will be the end of the 31 Day challenge - "recreate your favourite challenge". Lo and behold: the end is near! (Both for the challenge and this year!)

Thursday, December 8, 2011

Day 24: Inspired by a Book Cover

Today's challenge was supposed to be inspired by a book. As a profoundly superficial person, I chose to be inspired by a book cover instead. I had my latest bagbook (I always carry a piece of easy reading with me) just lying around when thinking of this challenge, and the inspiration hit me instantly.
I started with two coats of Revlon Frankly Scarlet (love the name!), which is one of my long time favourite reds. I think I got it from my mother as a present, even before I really got into nails and blogging. So thanks a lot, mum, and yes, you will be held responsible.
 Just take a look at that subtle golden shimmer!
Progressing with the mani from light tones to darker ones, I sponged on some OPI from A to Z-urich near the cuticles and China Glaze Short and Sassy to still a bit smaller area. Finally, I sponged in some "stripes"with China Glaze Loft-y Ambitions and Nicole by OPI Black Cat-cha Later.
For sponging in this mani I used a piece cut out of a regular kitchen sponge. Not very high-tech, but it worked perfectly! I've also got some sponge tip make up applicators in my nail art stuff, but I prefer the kitchen sponge for this look and coarser sponging.
My hands looked really creepy after the sponging, it would have made a great Halloween mani. My culticles were blood coloured all over and the surface of the nail was gritty like there really was blood all over them. Eugh! Needless to say the cleanup was a mess..
Here are all the polishes I used, and the book:
The book was good in its genre, by the way. I've quite recently found Nesbø, read a few of his books and still like his style. If you're after a page turner in crime novels and read your Larssons, go for Nesbø.